Getting back inactive memory on Mac.

     OS X has the habit of keeping recently closed applications in memory so that if they are run again, they load quickly. The part of physical memory used for this purpose is called “Inactive memory”. The “System Memory” tab on the Activity Monitor application gives a break-down of the physical memory, including available free and inactive memory. Because of the way OS X behaves, you may or may not notice your system running low on “free” memory every now and then. This discovery could perplex you, because despite being low on free memory, you can load applications and go about doing your work. This is possible because inactive memory can be released by the OS X kernel’s memory management subsystem on demand. If it finds that the system is running short on free memory, and the user has started an application that is not already loaded in inactive memory, it will gladly comply and release enough of inactive memory to be able to run the requested application.

     I recently found a command line utility on OS X to release most of inactive memory. It is called, “purge”. The short description for “purge”, from its man page, states that its use forces the disk cache to be purged. The “disk cache” actually refers to “inactive memory”. To run this command, you have to type “purge” on Terminal.app (or any other Terminal application that you use). For example:

(Ayaz@mbp) [0] [~]
$ purge

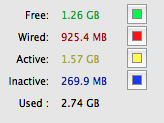
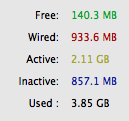
     Before running the purge command, the memory breakdown on my system looked like:

     After the purge command ran, inactive memory went from 858MB down to 270MB.

     You will notice that the system becomes a little unresponsive while purge is flushing the disk cache. That’s fine and nothing to worry about.

     If you can’t find purge on your system, it could be because you have not installed XCode and accompanying development tools. These are available in one of the OS X installation discs. You can now also pay and download XCode from the Mac App Store.

     Have fun and be nice!

Resize images with Preview on Mac OS X

Thinking that there’s no way built into Mac OS X to resize images, I have been for a long time hunting down free third-party image resize applications. What I did not know and could not find until today is that the Preview application, which is used to preview images by default on Mac OS X, has a convenient resize feature built right into it. It is found under the Tools menu, aptly named “Adjust Size“.

One apparent gotcha that can bite you crazy about resizing using Preview is that after adjusting the size for an image, the preview of the image will shrink considerably to a size smaller than you would expect. Don’t let that mislead you. Once you save the image, Preview will re-display the image in the proper, expected size.

A guide to configuring two different Django versions for development

Django 0.9x and Django 1.x branches are so far apart that a project built on top of the former, not least when it has been rolled off into production, that porting it to the 1.x branch of Django can easily escalate into a nightmare. If you have to maintain a legacy Django project — I choose to call projects built on anything before 1.x legacy –, you will find that it is easier if you maintain two different versions of Django on your development environment. How do you do that, is the quagmire this post revolves around.

I prefer Apache with mod_python to Django’s simplistic development web-server for Django projects. Initially, the task of setting up mod_python and Apache to your tastes may seem daunting. However, once you get around its not so steep curve, the difficult task becomes second nature.

I am working with Python 2.5 on a project with Django 1.0.2. Django is deployed on the system in the site-wide default directory for third-party Python modules and applications. I also have to support development for a legacy application built on Django 0.97 (a trunk snapshot from a time long ago). My requirement is simple: I want to be able to run both projects simultaneously without having to muck around tweaking configurations besides the one time when I set the projects up.

A garden-variety solution is to change the default Django directory in the Python path to point to the specific Django that is the need of the moment. This approach puts upfront a limitation of not being able to run both projects side by side. It also is annoying because it requires tap-dancing around Django directories when switching between the two versions. It is not a considerable blow to productivity, but if it can be avoided for a better, more efficient solution, there is no reason not to.

The solution I am proposing involves having the recent Django set up as the default, with the legacy Django installed in a different directory—after all, the legacy Django is the odd item of the group. I develop on an OS X environment, where I have the two Django versions set up thus:

/Library/Python/2.5/site-packages/django
/Library/Python/2.5/site-packages/django-0.97/django

You can probably tell which is which.

I have both projects deployed as virtual hosts on Apache, each running off of the root of the web-server without stepping on the feet of the other. They can easily instead be set up to, instead of the root of the web-server, serve from under a unique sub-URL path. That is mostly a matter of preference.

For each virtual host, I have assigned a domain name based off of the name of the project. I should emphatically point out that these domains are set up to resolve to localhost on my system. They may likely have real world twins that are routable over the Internet, but for all intents and purposes, they are local to my development environment. I have done it so, partly out of convenience, and partly because one of the projects hinges on subdomain-based user-to-account mapping (what this means, simply, is that registered users on the project are assigned different accounts that directly relate to subdomains, and can log in to the project only via their respective subdomains) for proper functioning. For the latter, the domain based approach was inevitable.

With that in mind, here are the virtual host settings for the two projects

<VirtualHost *:80>
   ServerAdmin root@localhost
   ServerName projectone.com
   <Location "/">
      SetHandler python-program
      PythonHandler django.core.handlers.modpython
      SetEnv DJANGO_SETTINGS_MODULE projectone.settings
      PythonPath "['/Users/ayaz/Work/', 
            '/Users/ayaz/Work/projectone/'] + sys.path"
      PythonDebug On
   </Location>
</VirtualHost>

<VirtualHost *:80>
   ServerAdmin root@localhost
   ServerName legacyproject.com
   <Location "/">
      SetHandler python-program
      PythonHandler django.core.handlers.modpython
      SetEnv DJANGO_SETTINGS_MODULE legacyproject.settings
      PythonPath "['/Library/Python/2.5/site-packages/django-0.97', 
            '/Users/ayaz/Work/', '/Users/ayaz/Work/legacyproject/'] + sys.path"
      PythonDebug On
        </Location>
</VirtualHost>

While each line of the above is important, the following is the highlight of this post:

   PythonPath "['/Library/Python/2.5/site-packages/django-0.97', 
            '/Users/ayaz/Work/', '/Users/ayaz/Work/legacyproject/'] + sys.path"

I have effectively injected the path to Django 0.97 into Python path. What this helps achieve is that when mod_python loads the Python interpreter to serve an incoming request for the project, Python analyses its path, looking for a module named django. The first successful match is under the /django-0.97 directory, which, if I have not already lulled you into sleep, is where Django 0.97 lives.

For the curious, all possible mod_python directives are documented here.

All this is a one-time headache: you pop in a pill, and forget about it. I can now type in projectone.com or legacyproject.com in the browser to get to either project.

I should mention, still and all, that I have of late come to know of virtualenv, a Virtual Python Environment builder. It may be a more proper solution than what I have proposed, but I have not yet used it myself to say more.

I hope I was able to clearly explain what I had intended to.
Building MySQL-python on OS X 10.5.x (Leopard)

Stock OS X 10.5.4 (Leopard) is devoid of MySQL. Thankfully, binary packages are available from the official MySQL.com website (MySQL 5.0.67, in this case). To use Python with MySQL, not least such when with the MySQL backend, Django is required to run, a Python binding to MySQL need be installed. It is called MySQL-python, and at the time of writing, 1.2.2 is its latest version available. To many a user’s dismay, binary packages of it are not available yet on the official website. To add fuel to fire, causing much frustration, building from source of MySQL-python is best an exercise not suited for those faint of heart.

Two packages, peculiarly to many and aptly to some, named mysql15-dev and mysql15-shlibs, providing development headers and libraries and a bunch of shared libraries all in some manner related to MySQL-5.0.x, are required. With a binary package of MySQL installed already, it makes sense to have binary packages as well of these two installed. This is where the mighty, god-sent fink comes to timely rescue. Luckily, the fink repo has binary packages of the two softwares in question available. Being a dependency of mysql15-dev, mysql15-shlibs is automatically installed with a touch of command such as this:

$ sudo fink --use-binary-dist install mysql15-dev

Building and installing MySQL-python from hereon isn’t any more difficult than running the de facto python package build and install commands. Voila!

MacBook, OS X, some cool softwares, and happy me!

I have always dreamt of having a MacBook one day. Last week was nothing short of a dream coming true (much thanks to you know who you are). I got my first brand-new, shiny spanking white MacBook. It’s got a 2.1-GHz core 2 duo processor. I bumped up the RAM from the standard 1-GB to a whooping 4-GB. The screen is smaller than my Dell, about 13.1 inches. The entire laptop, in fact, is much smaller than the Dell. But doubtless it is nothing short of being a beauty. It is running the latest iteration of Mac OS X, Leopard, 10.5.5.

I wanted to mention some of the softwares I have downloaded and/or installed separately. Some of them are what I believe those that any first-time Mac user would want to have on their Mac. Do note that I’ve never earnestly used a Mac before, which pretty much makes me a first-time user.

IM

  • Adium Adium is a multi-protocol IM software for Mac. Being multi-protocol, it supports a two dozen different protocols. I use it mostly for MSN, Yahoo, and GTalk. The interface resembles very much, if you have used it, Pidgin. It is stable, and works very reliably.
  • Mac Messenger There is also a free port of MSN Messenger available on Mac called the Mac Messenger. It isn’t exactly like the Windows counterpart in terms of UI and features, but for those of you who want a similar experience, it is the best thing that comes the closest.
  • X-Chat Aqua Yes. That is X-Chat on Mac. It is an awesome IRC client for Mac. I have used it on Windows and Linux before.
  • Skype You know what Skype is. Best for voice and video chat on Mac with all your friends who don’t own a Mac–those who do, I would highly recommend the built-in Mac application iChat. Excellent stuff.
  • Colloquy This is an advanced IRC client for Mac that supports both IRC and SILC (if you’ve ever used that before).

Office Productivity

  • OpenOffice.org for Mac I needn’t say anything. It is great.
  • Microsoft Office for Mac There is also the famous Microsoft Office for Mac, but, you guessed it, it isn’t free of cost.
  • FreeMind An excellent Java-based mind mapping tool. Great for brain-storming and generally anything that requires you to create mind maps.

Browser

  • Firefox How can I not mention that? Safari, Apple’s premier browser, is great, but Firefox is greater.

Package Management
If you are migrating from a Linux background, as I am, you will find the following two tools indispensable. They are the equivalents of tools you might be in love with on Linux, such as, ‘apt-get’, ‘yum’, etc.

Development

  • XCode and Mac Dev Tools XCode is Apple’s development environment on Mac. Not merely an IDE, it constitutes the entire development tool chain, including gcc, gdb, make, etc, along with the Cocoa and Carbon frameworks and tools for development in Objective-C. Even if you don’t require the IDE or the frameworks, you may still need the development tool chain, if you ever plan to build software from source (not least your favourite open source softwares).
  • iPython If you hack often on the Python shell, it goes without saying that you MUST get iPython. You will never look back. It is an excellent wrapper over the bare Python shell, providing countless convenience features and lots of colourful eye-candy.
  • pysqlite Mac comes with the SQLite DB and client pre-installed. For the Python SQLite binding, you have to compile and install pysqlite from scratch. There may also be binary packages available.

SCM

  • Git If you want to move onto a feature-rich, robust and reliable distributed source code management system, do give Git a go.
  • Subversion (SVN) SVN comes pre-installed with Mac. For a non-distributed SCM, I’d pick SVN any day.

Right, that’s all for now. I’ll be droning on about everything Mac quite often now.

On someone’s requests, I made a five minutes un-boxing video of my Mac. I have it available in private on youtube. If you’d like to take a peek at it, please email me your YouTube account ID at ayaz -at- ayaz.pk and I’ll send you the link.