Docker

Docker is almost the rage these days. If you don’t know what Docker is, you should head on over www.docker.io. It’s a container engine, designed to run on Virtual Machines, on bare-metal physical servers, on OpenStack clusters, on AWS instances, or pretty much any other form of machine incarnation you could think of. With Docker, you can easily create very lightweight containers that run your applications. What’s really stunning about Docker is that you can create a lightweight container for your application in your development environment once, and have the same container run at scale in a production environment.

The best way to appreciate the power Docker puts at your fingertips is to try it out for yourself. If you wish to do it, I would recommend the browser-based interactive tutorial on Docker’s website.

While it is easy to build Docker containers manually, the real power of Docker comes from what is known as a Dockerfile. A Dockerfile, using a very simple syntax that can be learnt quickly, makes possible automating the process of setting up and configuring the container’s environment to run your application.

On a weekend I finally took out time for myself and sat down to embrace Docker, not only through the interactive tutorial on Docker’s website, but also on my server. I was half lucky in that I didn’t need to have to set Docker up on my local system or VM, because Linode just happened to very recently introduce support for Docker. I started playing around with Docker commands on the shell manually, and slowly transitioned to writing my own Dockerfile. The result: I wrote a Dockerfile to run a small container to run “irssi” inside it. Go ahead and check it out, please. If you have a system with Docker running on it (and I really think you should have one), you can follow the two or three commands listed on the README file to build and run my container. It is that easy!

Getting back inactive memory on Mac.

     OS X has the habit of keeping recently closed applications in memory so that if they are run again, they load quickly. The part of physical memory used for this purpose is called “Inactive memory”. The “System Memory” tab on the Activity Monitor application gives a break-down of the physical memory, including available free and inactive memory. Because of the way OS X behaves, you may or may not notice your system running low on “free” memory every now and then. This discovery could perplex you, because despite being low on free memory, you can load applications and go about doing your work. This is possible because inactive memory can be released by the OS X kernel’s memory management subsystem on demand. If it finds that the system is running short on free memory, and the user has started an application that is not already loaded in inactive memory, it will gladly comply and release enough of inactive memory to be able to run the requested application.

     I recently found a command line utility on OS X to release most of inactive memory. It is called, “purge”. The short description for “purge”, from its man page, states that its use forces the disk cache to be purged. The “disk cache” actually refers to “inactive memory”. To run this command, you have to type “purge” on Terminal.app (or any other Terminal application that you use). For example:

(Ayaz@mbp) [0] [~]
$ purge

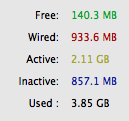
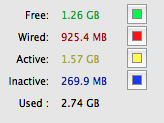
     Before running the purge command, the memory breakdown on my system looked like:

     After the purge command ran, inactive memory went from 858MB down to 270MB.

     You will notice that the system becomes a little unresponsive while purge is flushing the disk cache. That’s fine and nothing to worry about.

     If you can’t find purge on your system, it could be because you have not installed XCode and accompanying development tools. These are available in one of the OS X installation discs. You can now also pay and download XCode from the Mac App Store.

     Have fun and be nice!

Converting a Git repo to Mercurial

     Until today, we had most of the projects on Mercurial repositories hosted on a Windows box in-house. The Mercurial web interface was set up to provide a convenient read-only access to both contributors and non-contributors within. However, the box in question was unreliable, and so was the Internet link it was alive on. And, in this world, there are few things more troublesome than having your source control server unavailable due to an unexpected downtime.

     What’s special about today is that we moved most of our Mercurial repositories to BitBucket.org. While they will remain private, the contributors as well as the internal non-contributors will be given access to them. Aside from having the repositories on a central server that we can mostly always rely on, having a lovely Web interface to browse and control the repositories, we also get useful goodies like issue trackers, wiki pages, and an easy user management interface. It is a win-win situation for everyone.

     One of the projects I was working on had only been on a local Git repository. I started work on it at a time when I found myself deeply in love with Git. Since BitBucket is a Mercurial repository warehouse, I had to find a way to convert or migrate the Git repository into a Mercurial one.

     I looked around on the Web and found a lot of people recommending the use of the HgGit plugin. As I understood it, this plugin made possible, among other things, the workflow that involved working on a Git repository and pushing the changesets to a Mercurial counterpart. However, the process of setting it up seemed rather complex to me. Plus, I didn’t want to keep the Git repository lying around when I was done with the migration. I wanted to be able to migrate the Git repository to a Mercurial one, push it upstream to BitBucket and make any changes in future in the source code by cloning from the Mercurial repository. What HgGit did seemed rather overkill for my needs.

     I then discovered the Mercurial ConvertExtension. This extension did just what I wanted: Convert repositories from a handful different SCMs into Mercurial. The process of converting a Git (or any other repository) to a Mercurial one through ConvertExtension is very straightforward.

     As a first step, you are required to edit your global .hgrc file to enable the extension thus:


[extensions]
hgext.convert=

     You are then required to run the hg convert command on your target Git repository thus:


$ hg convert /path/to/git/repo

     This will migrate the Git repository, and store it in the current directory inside a directory named repo-hg. Once inside the newly created Mercurial repository (and this part is important), you have to run the following command to checkout all the changesets:


$ hg checkout

     You may then push the repository with the usual hg push to BitBucket.

     :)

     PS: This blog post really helped get me going in the right direction.

Ranting about Mercurial (hg) (part 1)

     The day I got a grip of git, I fell in love with it. Yes, I am talking about the famous distributed version control application: git. I was a happy Subversion (svn) user before discovering git. The day to day workflow with git and the way git worked made me hate Subversion. I was totally head over heels in love with git.

     I have come to a point where the first thing I do when I am about to start a new project is to start a git repository for that project. Why? Because it is so easy and conveneient to do. I really like the git workflow and the little tools that come with it. I know that people who complain about git often lament about its lack of good, proper GUI front-ends. While the state of GUI front-ends for git has improved incredibly and drastically over the years, I consider myself a happy command-line user of git. All my interactions with git happen on the command-line. And, I will admit, it does not slow me down or hinder my progress or limit me in any way in what I do. I have managed fairly large projects on git from the command-line, and let me tell you, if you are not afraid of working on the command-line, it is extremely manageable. However, I understand that a lot of people run away from the command-line as if it were the plague. For those people, there are some really good git GUI front-ends available.

     I have to admit that for someone coming from no version control background or centralized version control background (such as Subversion or CVS), the learning curve to git could turn out to be a litle steep. I know that it was for me, especially when it came to getting to grips with concepts involving pushing, pulling, rebasing, merging, etc. I don’t think I will be off-base here to think that a good number of people who use version control software for fairly basic tasks are afraid of merge conflicts in code when collaborating code. I know I was always afraid of it, until I actually finally faced a merge conflict for the first time. That was the last time I felt afraid of it, because I was surprised to find out how easy it was to deal with and (possibly) resolve merge conflicts. There’s no rocket science to it.

     I have been plenty impressed with git that I wince when I am forced to use any other version control. In fact, I refuse to use Subversion, as an example, and try my best to convince people to move to git. Why? Because git is just that good. I should probably point the reader to this lovely article that puts down severals reasons that explain why git is better that a number of other popular version control applications out there.

     Recently, at work, I have had to deal with the beast they call Mercurial (hg). Yes, it is another famous distributed version control system out there. I was furious at the decision of my peers to select Mercurial for work-related use, and tried my best to convince them to use git instead, but they didn’t give in to my attempts to persaude them. I had no choice but to unwilling embrace the beast and work with it.

     Instantly, I had big gripes with the way Mercurial worked as well as its general workflow. Where I fell in love with how git tracked content and not files, I hated the fact that Mercurial only tracked files. What I mean by that is if you add a file in a Mercurial repository to be tracked and commit it, and then make any changes to the file, Mercurial would automatically add it to the staging commit. Yes, it wouldn’t let you specify manually which files that were changed should be part of the staging commit, something that git does. A staging commit is a staging area where files that have been changed and have been selected to be part of the next commit are loaded to be ready for commit. With git, you have to manually specify which file to add to the staging commit. And I loved doing it that way. With Mercurial, this was done automatically. This in turn brings me to the second big gripe I had with Mercurial: incremental commits. Git workflow places an indirect emphasis on incremental commits. What are incremental commits? In the version control world, it is considered best practice to perform a commit that is as small as possible and that does not break any existing functionality. So, if for example, you have made changes to ten files to add five different functionalities, that may be independent of each other, but would only like to commit one functionality at a time. That is where incremental commits come in action. With incremental commits, you specify only the files you want to be committed and commit them, instead of committing all the changed files in a bunch and add a general purpose commit message. Incremental commits is a big win for me, and I adore that feature. Because with git you had to manually specify which of the changed files you wanted in the staging commit area, incremental commits came easily and naturally. With Mercurial, where it automatically added all changes to tracked files into the staging commit area, it did not.

     So I asked the obvious question: How do we do incremental commits with Mercurial? Aftering sifting through the logs, I found out that it was indeed possible, but in a very ugly way. The Mercurial commit command takes an extra parameter, -I, that can be used to specify which files explicity to make part of the commit. But that wasn’t it. If you had, say, five files of the ten changed files you wanted to commit, you would have to tag the -I switch behind each of those files, otherwise, Mercurial will fail to include the files in the commit. To this day, this little quirk bites me every now and then.

     I will admit that the one thing I really liked about Mercurial was the built-in web server it came with that could provide a web-based interface to your Mercurial repositories for viewing. This was something that was missing from or quite difficult to do with git. And, this was also one of the biggest reasons why my peers at work decided to go with Mercurial for. They all wanted a convenient way to access the repositories over the web.

To be continued.

Jagged fonts on Snow Leopard on LCD over DVI

     I have a 13″ white MacBook. It has a glossy display that is about the best I have ever used in my life. Great quality, lovely fonts. The only drawback with it is a drawback with glossy displays: it reflects ambiant light which can at times cause problems. But I really don’t mind that. I can work around it easily. Overall, I am really happy with the display on the MacBook.

     The only problem is, 13″ is just not enough. Not all the time. But when you are managing many things side by side, and not least when writing code, you can really get frustrated from not having enough space on the screen. After all, it doesn’t help that you’ve windows hiding behind your current window in focus because there is no space left anywhere on the screen to toss two or three windows side-by-side and still be able to get anything done.

     So, a year ago, I purchased, after careful thought and research, a ViewSonic VX1940w external LCD. The reason I settled on this one, and not any other, is a combination of: a) great price I was getting on it; b) excellent resolution it was offering at that price; c) it sported both VGA and DVI inputs. I really, really wanted an LCD with a DVI input. If you haven’t clicked on the LCD catalog page, this LCD sports a max resolution of 1680×1050 and is 19″ in size and wide-screen. It has a matte display, in that, it does not have the reflection problem the glossy displays suffer from. But it isn’t nearly so crisp in display quality as the glossy.

     If you’ve had the occasion to use any Mac laptop, you’ll know that they don’t have the de facto VGA and DVI input/output ports. Instead they can have any one of mini-DVI, mini-VGA, mini-DisplayPort, or micro-DVI/VGA ports, which by the way are all Apple proprietary stuff. So, how do you connect almost all of the LCDs out there that come with standard VGA and DVI ports and connector wires? You buy VGA and/or DVI adpaters from Apple. These, I should mention, are anything but cheap.

     Naturally, I wanted to buy the DVI adapter for my MacBook. However, I did some research and found bad news in that, a lot of people on the Mac forums reported their LCDs not working with the DVI adapters Apple provides because of the latter being either DVI-I or DVI-D, and most LCDs not supporting one or the other. That scared me. The DVI adapter was expensive to being with, I was not sure whether it would really work with my LCD. So, I took the safe lane out and bought the VGA adapter. And it worked out of the box.

     But, there were problems. These were the sort of problems I documented in a question titled, “Why do I feel a strain on my eyes when I look at the 19″ matte display?“, that I asked on the Super User forum. You may want to skim through it to get the excruciating details of the problems I faced with the VGA display on the LCD. The bottom-line was that that I was told that I had to get the DVI adapter instead, and that because of the jagged fonts on the VGA display and generally sub-standard picture quality, my eyes were having a hard time adjusting, resulting in strain and headache. Initially, it didn’t make sense to me how that could really be the cause of the problem, and didn’t buy it. But, the fact remained that I couldn’t use the LCD for long without walking off with an incredible burden weighing down on my eyes.

     Finally, I bit the bullet today and bought a mini-DVI to DVI adapter. Having plugged it in, I noticed that the “auto image adjust” functionality on the LCD was disabled. It wasn’t when the VGA was plugged in. Despite changing a couple of settings that I thought might make a difference, I felt that the fonts looked even more jagged, the picture quality worse than before. Having spent some more time staring on the screen, opening up Terminals and editors and windows, I realized it wasn’t merely a feeling. The fonts and the display did look much worse than before. I freaked out. I didn’t know what to do. I rebooted the MacBook in the hopes that when I plug in the LCD again, I will actually surprise myself. To my utter dismay, nothing changed. I was sorely disappointed, and I didn’t know what to do. A feeling of remorse hit me for having spent a fortune on the DVI adapter only to get a crappier picture than I did on VGA.

     With a heavy heart, I started looking around. I skimmed with grief through a couple of similar posts on the forums about how fonts on DVI input on LCD looked jagged, and such. Nothing suggested really helped. And then, I found this blog post, Snow Leopard Font Smoothing. It talked about the exact same problem I was having. And what’s more, it suggested a fix for the problem. The fix was to toggle a global setting on OS X by running the following command on the Terminal.app:

defaults -currentHost write -globalDomain AppleFontSmoothing -int 2

     I did this, but nothing worked. I wasn’t really sure what else I had to do to get this to work, neither did the blog post hinted at anything beyond running that command. After a while, I was convinced that there was no hope for me in this. I had nearly given up when I noticed the fonts on the text on the menu bar. It looked different. It was crisper, better, more beautiful. And then it hit me. I quickly, first of all, quit my Terminal.app, and when I re-opened it, voila! There they were. The lovely fonts I had fallen in love with on the MacBook screen. I restarted one by one most of the applications. Apparently, what little helpful bit that blog post missed out on was that you had to close all your applications and re-run them for the settings to take effect. I imagine an easier way is to simply log off and log back in.

     I am absolutely ecstatic with all this. Not only can I use my big LCD to manage my work in a better and more productive manner, I don’t have to walk away with unbearable headaches and eye-strain. Well, I still have headache and eye-strain, to be honest, but that’s an every-day thing. I am so happy.

Using mouse inside Vim on Terminal.app

     When I am writing code, I spend most of my time inside Vim on Terminal.app on MacOS. When I am not writing code, I still end up spending a good bit of my time on Terminal.app, running all sorts of commands, using command-line applications (such as irssi for IRC), and editing files in Vim here and there.

     Coming from Linux, my biggest gripe with Vim on Terminal.app has been the fact that I could not scroll through the Vim window using the wheel on my mouse as I would any normal editor. If I tried to scroll up or down, Terminal.app would scroll through the Terminal session instead and mess everything up. For a long time, I had to contend myself with holding down the Fn and Shift keys and using the Up and Down arrows to scroll back and forth. Anyone who has done this can immediately imagine how annoying this can get.

     So, the other day I had a thought cross my mind and I asked myself, “Vim can’t really be that lame and not support the functionality of scrolling with the mouse properly. I am simply missing out on something.” I looked around, and sure enough, I found that Vim does support all sorts of mouse-related operations on the shell, including properly scrolling up and down. This particular feature of Vim is toggled via the “:set mouse=a” setting. You could go through the help menu, with “:help mouse” inside a Vim session, to see what other values, apart from “a”, that setting can take. But for all intents and purposes, the “a” setting is sufficient.

     I was happy Vim could do that. But, when I toggled it in Vim on Terminal.app, it didn’t work. Scrolling, as before, would only scroll through the Terminal.app buffer and mess up things. I was disappointed.

     Sifting through a couple more threads here and there on the web about Vim, scroll, and Terminal.app, I was able to figure out the reason why, after enabling mouse support on Vim, it didn’t work on Terminal.app. As it turns out, Terminal.app eats away all the mouse gestures thrown at it, and does not delegate them to Vim or other applications running within the shell. It doesn’t let them through. Vim wasn’t getting any mouse gestures at all. This was a problem. I thought I had bumped into a big, thick wall that could not be crossed.

     But, I was wrong. Luckily, I somehow managed to find a plugin, by the name of Mouse Term, for Terminal.app that patched Terminal.app’s behaviour of masking mouse gestures and not letting them through to individual applications. Mouse Term, as is mentioned on its home page, requires another, small application, SIMBL, to be installed first to work. In fact, Mouse Term is a SIMBL plugin.

     Once I had SIMBL and then Mouse Term installed and Terminal.app loaded, I could actually scroll through Vim, with the “:set mouse=a” setting, prefectly. Not only that, I noticed something else as well that made me so happy. I use tabs in Vim. Vim makes available half a dozen Vim commands, that start with the prefex “:tab”, to manipulate tabs, navigate through them, etc. If you’ve ever used tabs seriously on Vim, and used these commands to cycle through tabs, for example, you’d understand how frustrating it can get. But, guess what my excitement was about? Not only could I now scroll through a Vim window smoothly, I could also click on the tabs to switch to them. I could also click on the “X” on the top right corner to close a tab. It simply worked.

     The best part is when you have the NERD Tree Vim plugin installed. You can, inside the NERD Tree window, expand and collapse directories and open files simply at the click or double click of the mouse. As a Vim user, what more could you want?

Pakistan Summer Time, and NTP on OS X

     I noticed today that, after a major update to OS X along with a security update, the time on the system clock was an hour ahead. In fact, I didn’t pick it up until after I had glanced at the time on my cell phone. When I opened the preferences where different settings related to time and date can be set, I realised that the Network Time Protocol (NTP) had been enabled, which meant that the system was syncing time and date, along with the usual time zone information, from a remote network time server. In my case, that server was time.asia.apple.com, one of three servers in the drop-down list of NTP servers in the preferences to choose from.

     As with the other two, time.asia.apple.com is an NTP server that is managed by Apple themselves. If you travel a lot, or if you are mindful of and in a place where daylight savings time is commonplace, being able to use an NTP server to not worry about having to change time and date is ideal. It is convenient. After all, time is important, and keeping track of time more so.

     Now, I love NTP. It sure beats having to change time manually all the time. But, what if the NTP server you so dearly depend on suddenly starts spewing out incorrect time? Well, you’d eventually notice that, yes, but it would be annoying. The emails you send are suddenly ahead of time, the IM messages you receive as well, your calendar events, etc. If the difference in time due to the error is subtle, say, maybe off by an hour or so, you will likely take longer to spot it. Not that your house will burn down, or your business will plummet in a downward spiral into loss, but it sure will cause problems, even if little, annoying ones.

     So, why am I here on a hot Saturday afternoon with no mains power, talking about all this? Because I found out today that time.asia.apple.com is giving out a time for Pakistan that is +6 GMT, when it should correctly be +5 GMT. Judging from the label “Pakistan Summer Time” that the NTP server is using to describe the time, I can understand where this skew in time is creeping in from. But it is wrong. And the time on my system is wrong. What’s worse is that the place in system preferences where date and time settings are, does not provide an option for me to use a custom NTP server of my own choosing. I am restricted to choosing from the drop-down of three NTP servers, only one of which applies to my time zone. Bugger!

     Until I found /etc/ntp.conf This small text file stores the address of an NTP server to use. Regardless of whether you have NTP time enabled in the preferences pane, you will have an existing entry in the file. If you change the address in there to point to something, say, asia.pool.ntp.org, the system will use the new NTP server. In the preferences, the NTP server you added will automatically be selected for you, even though, if you pull the drop-down, you won’t notice it in the choices available.

     The only problem is, asia.pool.ntp.org also has Pakistan time pinned down at +6 GMT. Square one!

VMware Fusion: The network bridge on device /dev/vment0 is not running

     That seems to be a common problem that users of VMware Fusion suffer from. I had to face it recently. I use VMware Fusion on Snow Leopard (OS X) to run Slackware Linux. My MacBook, on which I am running Snow Leopard, is connected to a WiFi hotspot via AirPort. I have VMware Fusion set up to use the network in bridged mode.

     A few days back, after having rebooted OS X (I reboot it what appears to be once every month), I started getting “The network bridge on device /dev/vmnet0 is not running” error on booting the Slackware VM. The network remained disconnected, with any attempts to connect it manually ending in that error. That meant that I could not get the VM on the network and use it (I tend to remotely utilise the VM over secure shell).

     Quitting and re-running VMware Fusion went in vain. It wasn’t until I searched for a possible cause of the problem and solution that I found one that worked for me. This particular solution requires manually restarting a bootstrap BASH script that is bundled with VMware Fusion. This script takes care of setting up the pertinent network interfaces and their modes, which are subsequently used by VMs.

     To be specific, that particular bootstrap script is found under the following folder:

/Library/Application Support/VMware Fusion/

     The name of script is “boot.sh“, and requires it be executed as root. So, all in all, what needs to be done is running this command from the shell:

$ sudo /Library/Application\ Support/VMware\ Fusion/boot.sh --restart

     I found this tip mentioned in one of the responses in the discussion here.

Carbide needs a rebuild option

     By and large, Carbide is the best IDE for Symbian development available today. Working on the shoulders of Eclipse, Nokia has spent considerable time and effort into customizing Carbide to a point where it makes Symbian development convenient for developers. Having said that, I should also point out that Nokia and Carbide both have a long way to go to provide as great an experience for Symbian development as, for instance, Apple and Xcode have for iPhone development.

     Under the hood, the Carbide camp has adopted what has become second nature for Unix and Linux developers: the “Keep It Simple, Stupid” (KISS) philosophy. Carbide heavily uses a tool-chain to perform a lot of different yet important tasks. That tool-chain includes interpreters such as Perl, compilers such as gcc, build configuration utilities such as make, powerful debuggers such as gdb, etc. When a project is built, or even cleaned, Carbide actively relies on this tool-chain to perform a set of very crucial tasks. And in the traditional Unix/Linux style, those disparate tools are linked together by the use of pipes. So, one tool performs one task that it is designed to do best, spewing its output to another tool to perform another task. This is a great philosophy to follow, I believe, because some of the best open source softwares are utilized. In other words, Carbide, among many other things, does two things in particular: it provides a polished, snazzy front-end that lives on top of powerful, command-line open source tools; and it links together a set of tools to make possible different things. If you have used Linux extensively or programmed on it, you will feel at home as this methodology is not uncommon there.

     Admittedly, I have a plethora of pet peeves with Carbide in general and Symbian development in particular. However, I have decided to gripe about one such annoyance that I have with Carbide. Carbide doesn’t have a “rebuild” option. Anyone reading this may think I am whining about a very trivial thing, but it isn’t trivial at all. Consider the fact that Carbide relies largely on piping together different command-line utilities to perform a disparate set of tasks, and presenting the results on the front-end. While Carbide does it mostly right, it falls short at many places when it comes to clearly showing what went on in the background, when, say, a project build fails due to errors. Building of a Symbian project can be divided into several parts, which Carbide abstracts under the “build” operation. These parts include, but are not limited to, compilation of resource files for UI elements, compilation of source files and linking of resulting object files, creation of binaries, packaging of binaries and resource files, creation of SIS files, signing of SIS files, etc. Carbide tries really hard to keep the user aware of anything that goes wrong at any of those steps during a project build. However, Carbide is not perfect, and as such leaves itself open to subtle problems that can become a cause of increased annoyance for the developer.

     Now, Carbide does have a “clean project” option, which is what I use before building a project every time. But I don’t know how many other developers do so — I did not use to routinely in the past, for example. If you are a Symbian developer, you must have been bitten at least once by the problem that arises from not cleaning your project before every build. Because the build process is divided into a number of different steps, with some steps producing concrete artifacts that are used by the following steps, there is a subtle, ugly problem lurking in there. Consider the step where resource files for the UI elements are built, and also the step where the package for the application/project is built. The latter has to incorporate all pertinent compiled resource files as well as binaries into one final package. And here lies the subtle problem: the tool that is used to create the package does not look at the previous steps to ensure that everything went ok. It can’t. All it does is that it looks into some directory for the presence of the compiled resource files and binaries it is looking for, picks them, and packages them up without thinking about whether the current build failed to produce any resource files or binaries, and that those that it picked are actually not from a previous, now out-dated build (which were left behind from the previous build because the build data wasn’t cleaned). This hideous problem surfaces when, after making adjustments in the UI elements and resource files, any compile time errors are introduced. Now, Carbide gets below par when it comes down to catching some of those errors. For example, for some hideous errors that crop up during resource compilation time, Carbide is only able to catch them when at the far end of the build process, the package manager fails to find compiled resource files because those didn’t compile from earlier. However, if there are older compiled resource files available, and an error is introduced in the resource files which precludes new resources from being built, those errors will be quietly lost because the package manager will quietly and happily pick up the old resource files (as it can’t tell which are new or old, or whether any of the steps that came before it actually passed). As a result, the developer will be left scratching their head for a long while, trying to figure out just why is it that their changes are not being picked up when they run their application. But, it could easily get worse than that.

     So, if you are a developer, and you are not in the habit of cleaning up your projects before compiling every time, you will one day or another get bitten by this hideous bug. And when you do, it will hurt for a long while before you are able to realize where it is hurting and band-aid it.

     This is the reason why I am in favor of Carbide having a “rebuild” option.

Debugging Django applications!

When developing Django applications, there can be many times when you would want to roll up your sleeves and get your hands dirty. You may want to know, for example, why the control isn’t falling into a certain block of code, what values are being returned to the view from the browser or test client, why a certain form is bailing out on you, or any manner of possible problematic scenarios. For these and many more, there are a number of things you can do to help yourself and your code. I am going to describe a couple of those that I frequently employ.

1. Quick and dirty debugging

Yes! It is the quickest, dirtiest, and easiest form of debugging that has been around since who knows when. Like with many other programming languages, it takes the form of Python print statements for Django. It is really helpful when you are running your Django applications off of the Django development server, where the print output make their way to the console from which the development server is run.

2. Python Logging framework

The Logging framework for Python is as easy to use as they come. The use of the logging framework resembles to some extent quick and dirty debugging, but goes much further in terms of the flexibility as well as the levels of sophistication it provides. The simplest and quickest use is to import the logging module in the file carrying the code you want to debug, and use any of the available log message creation methods: debug(), info(), warning(), error(), etc. The output from these methods will make their way to the console where the development server is running.

With the default settings, however, the logged messages do not provide useful information beyond what you tell them to print. Also, you have no control over where the messages end up showing. So, say, if you are running your Django project over Apache with mod_python or mod_wsgi, you may be up a stump trying to locate where the messages go, or you may want to keep the messages aloof in a different file, but will find that the default settings for the logging framework won’t be able to lend you much room to breathe.

However, that is where the Logging framework really shines. It is configurable to a great extent. The docs for the framework give detailed information about the different nuts and bolts of the framework and the different ways in which it can be tuned. For the sake of this article, I will briefly brush over a slightly basic configuration that I use the logging framework in when debugging Django applications. I simply create a basic configuration setting for the logger, and move it into the settings.py file for the Django project. It looks like this:

import logging
logging.basicConfig(level=logging.DEBUG,
  format='%(asctime)s %(funcName)s %(levelname)-8s %(message)s',
  datefmt='%a, %d %b %Y %H:%M:%S',
  filename='/tmp/project.log', filemode='w')

Not only does this separate the log messages to the file /tmp/project.log, it also adds useful debugging information to the start of each logged message. In this particular case, the date and time, the name of the function from which the logging method was called, the logging level, and the actual message passed are displayed. All these and much more are thoroughly documented with elaborate examples in the documentation for the logging module.

3. The Python Debugger (pdb)

You may probably already have used the pdb module before for debugging Python scripts. If you have not figured out already, you can just as easily use pdb to debug your Django applications.

If you are like me, you may have got into the habit of writing unit tests prior to writing down Django views that the unit tests test. It is a wonderful habit, but it can get unnerving at times when you are writing your tests first. This is primarily because of the way the unit tests interact with your code: Once written, they run in their entirety without any form of interaction from the user. If any number of tests fail, the fact is made clear at the conclusion of the test runner. What I want to say is that there is no easy way for you to interact when the tests are being run.

With pdb, you can have a moment to sit back and take a sigh of relief. By importing the pdb module, and calling the pdb.set_trace() method right before the point where you want to start to debug your code, you can force the test runner to freeze itself and drop to the familiar, friendly pdb prompt. This helps immensely when you want to find out, for example, why a form that you are unit testing is not validating, what error messages it is receiving, what errors or outputs it should produce so that your tests can simulate those, etc. Once at the pdb prompt, you may use the usual lot of pdb commands to inspect and step through the code.

The use of pdb, however, it not restricted to unit testing. It may equally well be used when serving your Django applications over the development server. However, there is one little detail that needs to be accounted for. When you want to debug your Django applications over the development server with pdb, you must start the development server with these additional switches:

$ python -m pdb manage.py runserver --noreload

The -m pdb switch is documented in the documentation for the pdb module. Simply, it makes sure that if the program being debugged burps and crashes (either owning to an error, or when stimulated such as by calling the pdb.set_trace() method), the pdb module automatically falls flat on its face and activates the post-mortem debugger. This is very convenient, because what it means is that the friendly pdb prompt shows up, and you can dissect the code from that point onwards.

The --noreload switch to the runserver command, however, is crucial. The Django development server is designed to automatically reload the Python interpreter if there’s a crash or error of some sort, or to reread all the Django files if there has been a change in any one of those. One fallout of this default behaviour of the development server is that since the Python interpreter is reloaded, all previous context is lost, and therefore, there is no way for pdb to save face. The --noreload switch, therefore, forces the Django server to stray off of its default behaviour.

With the development server running with these switches, all you have to do is make sure you have placed calls to pdb.set_trace() method in your code where you want to break out. And that’s as easy as it gets.

I hope that what I have described finds its way into the useful bucket of my readers. For now, that’s all. I hope you do enjoy, if you did not before, debugging your Django applications after reading this article. Please, stay safe, and good bye!
URL rewriting and WordPress

You may have noticed that WordPress by default creates and uses “Search Engine Optimized or Friendly” URLs. The raw URLs, which refer to the file on disk followed up by a train of grotesque-looking keywords and equals-signs and ampersands and question marks, are hidden from view. For WordPress, the magic comes from what is popularly known as URL rewriting. By sketching out simple or complex yet powerful rules to define what and how to rewrite, you can force the web server to completely transform URLs into clean, beautiful, search engine friendly forms.

Apache, a web server that can commonly be found to be the choice for deployment of WordPress, delegates the entire responsibility of URL rewriting to a module named mod_rewrite. URL rewriting rules can be defined globally, or on a per directory basis, which are interpreted and acted upon by mod_rewrite. In order for rules to be interpreted on a per directory basis, for which these are defined in a special configuration file that can exist within any directory, the AllowOverride setting must be enabled within Apache globally. If it isn’t, rules defined per directory will quietly be ignored.

In order for WordPress to weave its magic, both mod_rewrite and the AllowOverride setting must be enabled within Apache. This realisation dawned upon me when Asim mentioned that the two need to be enabled on Apache. On a server on which I had recently deployed WordPress for a friend, I noticed that created pages beyond the home page would give a mysterious 404. The two, as Asim gratuitously told me, were not enabled on Apache on that server which in turn were causing the 404 to pop out. I am surprised I did not stumble upon these two gotchas documented within WordPress—I may have overlooked, I am not sure.

I hope this serves to help a lost soul fumbling along a similar path.

Building MySQL-python on OS X 10.5.x (Leopard)

Stock OS X 10.5.4 (Leopard) is devoid of MySQL. Thankfully, binary packages are available from the official MySQL.com website (MySQL 5.0.67, in this case). To use Python with MySQL, not least such when with the MySQL backend, Django is required to run, a Python binding to MySQL need be installed. It is called MySQL-python, and at the time of writing, 1.2.2 is its latest version available. To many a user’s dismay, binary packages of it are not available yet on the official website. To add fuel to fire, causing much frustration, building from source of MySQL-python is best an exercise not suited for those faint of heart.

Two packages, peculiarly to many and aptly to some, named mysql15-dev and mysql15-shlibs, providing development headers and libraries and a bunch of shared libraries all in some manner related to MySQL-5.0.x, are required. With a binary package of MySQL installed already, it makes sense to have binary packages as well of these two installed. This is where the mighty, god-sent fink comes to timely rescue. Luckily, the fink repo has binary packages of the two softwares in question available. Being a dependency of mysql15-dev, mysql15-shlibs is automatically installed with a touch of command such as this:

$ sudo fink --use-binary-dist install mysql15-dev

Building and installing MySQL-python from hereon isn’t any more difficult than running the de facto python package build and install commands. Voila!

MacBook, OS X, some cool softwares, and happy me!

I have always dreamt of having a MacBook one day. Last week was nothing short of a dream coming true (much thanks to you know who you are). I got my first brand-new, shiny spanking white MacBook. It’s got a 2.1-GHz core 2 duo processor. I bumped up the RAM from the standard 1-GB to a whooping 4-GB. The screen is smaller than my Dell, about 13.1 inches. The entire laptop, in fact, is much smaller than the Dell. But doubtless it is nothing short of being a beauty. It is running the latest iteration of Mac OS X, Leopard, 10.5.5.

I wanted to mention some of the softwares I have downloaded and/or installed separately. Some of them are what I believe those that any first-time Mac user would want to have on their Mac. Do note that I’ve never earnestly used a Mac before, which pretty much makes me a first-time user.

IM

  • Adium Adium is a multi-protocol IM software for Mac. Being multi-protocol, it supports a two dozen different protocols. I use it mostly for MSN, Yahoo, and GTalk. The interface resembles very much, if you have used it, Pidgin. It is stable, and works very reliably.
  • Mac Messenger There is also a free port of MSN Messenger available on Mac called the Mac Messenger. It isn’t exactly like the Windows counterpart in terms of UI and features, but for those of you who want a similar experience, it is the best thing that comes the closest.
  • X-Chat Aqua Yes. That is X-Chat on Mac. It is an awesome IRC client for Mac. I have used it on Windows and Linux before.
  • Skype You know what Skype is. Best for voice and video chat on Mac with all your friends who don’t own a Mac–those who do, I would highly recommend the built-in Mac application iChat. Excellent stuff.
  • Colloquy This is an advanced IRC client for Mac that supports both IRC and SILC (if you’ve ever used that before).

Office Productivity

  • OpenOffice.org for Mac I needn’t say anything. It is great.
  • Microsoft Office for Mac There is also the famous Microsoft Office for Mac, but, you guessed it, it isn’t free of cost.
  • FreeMind An excellent Java-based mind mapping tool. Great for brain-storming and generally anything that requires you to create mind maps.

Browser

  • Firefox How can I not mention that? Safari, Apple’s premier browser, is great, but Firefox is greater.

Package Management
If you are migrating from a Linux background, as I am, you will find the following two tools indispensable. They are the equivalents of tools you might be in love with on Linux, such as, ‘apt-get’, ‘yum’, etc.

Development

  • XCode and Mac Dev Tools XCode is Apple’s development environment on Mac. Not merely an IDE, it constitutes the entire development tool chain, including gcc, gdb, make, etc, along with the Cocoa and Carbon frameworks and tools for development in Objective-C. Even if you don’t require the IDE or the frameworks, you may still need the development tool chain, if you ever plan to build software from source (not least your favourite open source softwares).
  • iPython If you hack often on the Python shell, it goes without saying that you MUST get iPython. You will never look back. It is an excellent wrapper over the bare Python shell, providing countless convenience features and lots of colourful eye-candy.
  • pysqlite Mac comes with the SQLite DB and client pre-installed. For the Python SQLite binding, you have to compile and install pysqlite from scratch. There may also be binary packages available.

SCM

  • Git If you want to move onto a feature-rich, robust and reliable distributed source code management system, do give Git a go.
  • Subversion (SVN) SVN comes pre-installed with Mac. For a non-distributed SCM, I’d pick SVN any day.

Right, that’s all for now. I’ll be droning on about everything Mac quite often now.

On someone’s requests, I made a five minutes un-boxing video of my Mac. I have it available in private on youtube. If you’d like to take a peek at it, please email me your YouTube account ID at ayaz -at- ayaz.pk and I’ll send you the link.

Software patents: How bad they are, and how big companies love them

This post on software patents and copyrights and everything else in between is a means of letting off steam caused by reading news that Apple is taking ideas from commercial softwares being actively sold and trying to get patents for those ideas posing as concepts of their own. Yes: Ideas and concepts Apple has not conceived themselves but would like to legally call their own and demand, if and whenever they like, a royalty from anyone building on those ideas — or, in the worst case scenario, sever competition. Patents are considered evil and bad, and there are good reasons why.

Apple is not the only company who is doing it. Most big companies do it; have done it in the past. It has almost become a trend: big companies openly filching ideas from commercial softwares not their own, and attempting to patent those ideas as their own. For example, here we see Microsoft finally being granted a patent on “Page Up” and “Page Down” keystrokes. As another example, Microsoft owns a patent on the “Tree-View” mode we have come to love in many file-system applications. These are merely examples, and Microsoft and Apple are not the only big companies indulging in such practices.

In the software industry, being able to get a patent for an idea you have conceived that hits of really well is bad enough already that you have big companies going out patenting popular concepts in softwares that aren’t theirs to begin with. Besides giving that big company who did not think of a famous idea but now owns it an unfair advantage to play evil, it severely cripples the ability of other companies in general and developers in particular to be able to build upon that idea in order to build and sell better, bigger products, especially when such an idea is as basic and simple in nature as a window layout — most or all products need to need to build upon that.

One has to understand what a patent (software patent, in particular, in this context) is in order to fully grasp the extent to which they are a threat to, for example and in particular, the software industry. Let’s go over it with a simplistic analogy. I think of a brilliant idea, such as, say, tabbed-window browsing. No-one at this point has thought of it yet. I go out and roll-over a browser which features an implementation of my tabbed-window browsing idea. As set out in the US Copyright Law (and in Copyright Laws elsewhere mostly), any implementation or creation, the moment it is materialised into any tangible form, automatically becomes the property of the individual implementing or creating, and as such, that individual automatically gets the copyrights for it. Now, copyright and patent are two different things. At this point, I have the copyright to my implementation of my idea of tabbed-window browsing — the browser, or at least if we only concentrate on the implementation of the idea, the code that implements the tabbed-window browsing functionality is under my copyright. My idea, however, is not.

Ideas can not be copyrighted. They can be patented though. And that is where patents come in. You cannot copyright an idea, because, according to the US Copyright Law, for anything to be copyrightable, it has to be a work, in a form tangible, of an idea. An idea is not something tangible. That is all fine, but how are patents a threat to the software industry? Let’s imagine, further, that you, a big company with a not-so-great browser product, go out of the way and patent the tabbed-window browsing idea that I thought of. You get the patent, and now you legally own the idea. And, then, you plan to play dirty. Since my browser with the tabbed-window browsing support is gaining popularity at a breath-taking speed, which is more than hurting your browser market penetration, you charge me for patent infringement. Yes. I, with the implementation of the idea of tabbed-window browsing which you now legally own, am infringing on something that you have a patent for. Forget about the moral implications of your getting a patent for what you did not think of, I am committing a crime. And you can drag me to court for it. Easily. At this point, there are two things you can force upon me to choose from to do: Either force all my customers to pay me a royalty fee which in turn I pay back to you, and continue to let my browser remain in business or at least existence, thereby continually paying you a royalty fee for as long as the browser lives; or, force me to pull back my product, and end its life. What is worse perhaps is that that there is barely much of anything I can do about it.

Now, do you see how bad patents are? Fortunately, unlike how copyright applies automatically the moment you create a tangible form of your work, the process to acquire patents is a long and tedious one, which requires filing a patent application at the patent office, waiting for the patent office to approve and grant the patent, and everything in between. However, the brutal fact that you do not have to prove that you are the one in fact who actually thought of an idea in order to get a patent is, most unfortunately, not a requirement for you to get a patent for that idea. That is how big companies manage to run away with patents for ideas that belong to others. Couple that with the threat patents cause I described earlier, and you may see how deadly patents can become if brandished by evil companies to leverage ill-gotten advantages.

As an individual, and not least a software developer, tester, etc, there is little you can do about this, but it helps to know. Let’s turn up a notch for no software patents.

Benchmarking Apache web server(s)

If you are not a systems administrator, you likely may never need to benchmark individual servers on which your applications are running. But if you are, odds are good that you already identify with the importance of knowing which parts of a system under your control are under-performing, causing bottlenecks, and plainly not coping up with the load.

I am going to make a passing mention only of two tools that can be used to benchmark Apache web servers. In comparison to other servers, ensuring that web servers are able to sufficiently handle the load they are sweating under is not only an old-running but an overly important issue to tackle. To that end, for Apache web servers, the following two tools can be used to implement extensive testing plans to measure up a whole slew of factors:

ab is easier to use, but less flexible and with fewer features. Apache JMeter, in contrast, packs buckets full of features than can be used to test an Apache web server in various conceivable manners.